Category Archives: cleaning

21 days to a more natural home series part 18…natural air fresheners

all natural home series


I love burning a nice smelling candle in my home almost every night.  I never thought until recently are there toxins in what I am burning in my home??   That led me to a little research online and YES there are toxins in the candles I was burning.

So, what’s wrong with my candles?
According to a recent study by the U.S. Consumer Product Safety Commission (CPSC), 40 percent of candles on the market contain lead wires inside their wicks. Most often, the candles with lead wicks are scented candles. Fragrance oils soften the wax, so the manufacturers use lead to make the wicks firmer.

A candle with a lead-core wick releases five times the amount of lead considered hazardous for children and exceeds EPA pollution standards for outdoor air, says the CPSC. Exposure to high amounts of lead has been linked to hormone disruption, behavioral problems, learning disabilities, and numerous health problems.

So what can we do with all of that??  First of all, ensure that any new candles you purchase don’t have lead in the wicks. Look for a “lead free” label, or perform the “No-Lead Test”.

  1. Look for a “lead-free” label when shopping for new candles.
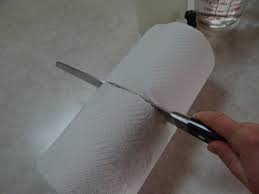
  2. For unburnt candles, rub the tip of the wick on a piece of paper. If it leaves a gray mark, like a pencil, the wick contains a lead core. If you’ve already purchased the candle, take it back to the store and tell the manager why you’re demanding a refund.
  3. For candles that have already been burned, you should just throw out any that have metal cores as a precaution. Simply look at the tip of the wick and see if it has a metal core. If you still can’t tell, peel back some of the cotton.

Now if my candles are bad, what else can I do to “naturally” freshen my home??

  • Keep the odors down in your household.  Keep trash cans emptied, throw diapers outside in the trash, wipe up and disinfect “smelly” areas, and keep pet smells under wraps.
  • Give your household a good old fashioned open window policy. Nothing is better than fresh air flowing through your household.
  • If your kitchen is smelly from cooking fish say…..boil some vinegar on the stove or in your microwave.  It will take away the smell.
  • Set a pot on your stove with water and some spices and simmer for a few hours.  I like to do cinnamon, nutmeg, and ginger.  Or use vanilla or almond extract.  You can boil cut up oranges and lemons as well.  Experiment with different spices to give a great quick scent.   Be sure to keep the water level in your pan as to not burn it.
  • A few drops of essential oils dropped in different areas helps with scent controls.  Or you can mix it with some water and alcohol in a spray bottle and in the air.

You want to avoid all the “heavy-strong” smelling factory made air fresheners.  Most all contain carcinogens.  Look at part 2 of this series for links to the Cancer Prevention Coalition website that lists many products that contain these harmful substances.  They cause many harmful side effects as well.  Even though they smell so great, you want to avoid all those chemical laden product, for the safety of your children and yourself.

Look for part 19…how to repel bugs naturally

21 days to a more natural home series part 16…wipes

all natural home series


Convenience that is the name of what we want nowadays.  We want convenient foods, convenient people, and definitely our cleaning to be convenient.  So what if it is more of a pain to drag out the spray bottle and paper towels to clean up our messes all of the time??  What if we didn’t want to get a washcloth wet every time we changed the babies bottom??The answer is wipes.

It is so easy to make your own cleaning wipes at a fraction of the price of store bought ones.  All it takes is some time and creativity to make some.

There are numerous ways you can do this. You will need good sturdy paper towels.  I would recommend Bounty, for the extra cents it costs the quality will be better and easier to rip apart.

We then need to decide which type of container you are going to be using for storing the wipes in.

Option 1:  You can take an old wipey box and unroll and fold paper towels to neatly fit inside your container, would probably take awhile and I know would drive me crazy.  images

Option 2:  You can take a roll of paper towels and cut in half with either a sharp serrated knife, an electric knife,  or use a band saw to easily do the job.  images (2)

Then place them in a smaller plastic container.  You can use numerous containers— ice cream buckets, large coffee cans with lids, or regular plastic tupperware containers.images (1)

Option 3:  Get a roll of paper towels, and find a container that it will fit into and you will have no need to cut or fold your wipes.  I believe they will fit in a large reusable store bought wipe container.

download

I gave all the options I knew of because it all is going to depend upon what size container you have to put them in. If you have the money save some heartache and go buy a store bought wipe container and use it up and then start making wipes from it next month:).

For your type of wipes you can make all sorts.

  • cleaning wipes—using our all natural all-purpose spray solution.  Just pour over top of the wipes and you are ready to use them.
  • baby wipes–2 cups distilled water–or boiled then cooled
    1 tablespoon castile soap (or other natural, mild soap)
    1 tablespoon aloe vera gel
    1 tablespoon witch hazel extract
    1 tablespoon sweet almond oil (or olive oil)
    10-15 drops essential oils of choice (optional)
    combine above and pour over your paper towels.  You may have to invert the container a few times to make sure that the towels get completely wet.
  • window cleaning wipes.  Pour in the all natural window cleaner solution and you have instant wipes.
  • makeup remover wipes.  Just cut your paper towels into a smaller size and use like a sour cream container to store these in. 2 cups of distilled water–or boiled then cooled, 2 tablespoons of coconut oil, and 2 squirts of castile soap.

This is just one way to start making those small steps from convenience to homemade.  The more steps you take the more you are on your way to a more simplier and plainer lifestyle.

21 days to a more natural home series part 15….household items

all natural home seriesOn part 15 of our series we are going to find yet another way to make our homes more natural.

When we think of “all natural” we can think of things that have sustainability, things that we will have for a while, things that don’t need to be thrown away.

One item we replaced in the last few years is cloth napkins.  We wasted alot of money on paper napkins.  I ended up going to Goodwill and finding multiple sets of cloth napkins that we reuse again and again.  I find that cloth clean up better than paper does and then we just throw them in the washer, ready for the next time.

Grocery bags———–oh the numerous bags we have in our household each month.  For our family, we do once a month shopping, it isn’t very feasible for me to buy reusable bags for our grocery shopping, we would have to have much.  But we do recycle and reuse our grocery bags from lining the bathroom trashes, to scooping out the kitty litter.  After each month has passed we are usually in need of more bags.

We do use the material  reusable bags for library books and for toting things to friends homes.  I try to keep some in the car, so that if I do not remember they are always there.

Another way to add to your “all natural home” is by cutting down on the obvious–paper plates, cups, plastic silverware, plastic bags, etc.    We try to reuse our ziploc baggies, by rinsing and hanging with a clothespins on the window to dry.  We don’t wipe off foil and reuse  but I try to use a piece that does not have food on it more than once.  (we do not have a microwave, so we reheat items in the oven and need foil to cover them).  Anything you can do to reduce the amount of items that we throw away in the trash.

Paper towels are a biggie for some of us.  You can use small pieces of cut up rags and then just throw them into the wash to help save on buying paper towels.

Up tomorrow……wipes…….wipes……..wipes……the new “instant” craze

21 days to a more natural home series…part 14 cloth diapers and sanitary napkins

all natural home series

On part 14 of our series this will discuss our cloth diaper routine.  As well as discuss options for woman to use a natural alternative to maxi pads.

When I was a new mother I just did what everyone else did and that was to buy disposable diapers.  I never really thought much about what that was doing to the environment or to my children.   There are many websites devoted to cloth diapering facts, The real Diaper association has many up to date facts about why it is better to use cloth diapers.

After years of wasting money on disposable diapers we finally had to for financial reasons start using cloth.  At first I just use the old-fashioned pre-fold, pins, and rubber pants and that was okay.  Then as time went on and I was able to buy a “better diaper” I came across these.

333 013

BumGenius4.0  these are the best diapers for our family.  They are a one size fits all diaper.  I have used these for the last 5 babies and they are still working like a charm.  When my  babies are new-born they snap down to a smaller size and as they grow, you unsnap and elongate the diaper.    I love them and would recommend to anyone that is having a baby or wants something that will hold up for the next 5 babies!!


This is our cloth diaper routine………. when I need to change a diaper, I grab a wet washcloth and use that instead of wipes.

333 014 Here is our diaper pail, lined with a diaper bag.  I think we bought the “trash can” at Lowes.333 018 Throw the diaper and washcloth inside the can.  I only dump the messy diapers into the toilet, if they will easily come off the diaper. I used to wring the diapers out in the toilet water, but got so tired of that, I realized that if the diaper solid was hard it will roll off but if not the washer will rinse it away just fine.  I do not separate the inserts from the diapers takes way too long.333 019 Full can, time to do a load333 029 Grab your diaper liner bag with the diaper contents inside333 030 dump it into the washer333 032 do a cold rinse cycle on high speed333 033After the load has rinsed out, I then reach into my washer and find the diapers that didn’t spin themselves apart and separate the liners from the diapers.  Usually there are only a few that don’t make their way out.  To me this is way easier than separating them into the can.

I then add a scoop of homemade laundry detergent.  Never use commercial laundry soap on your cloth diapers it leaves a residue that will make your diapers not absorb and hold in “pee” smell.333 035 Do a hot water “whites” load, heavy-duty with an extra rinse.  Do not add additional things like fabric softener or vinegar just the homemade soap will do the trick.333 037As the washer is going, put in another diaper pail liner so that your pail is ready for the next dirty diaper.  I still have the same liners after 5 years of washing and they are in great shape.
333 039 After the washer has finished, you can put the inserts into the dryer and dry on a high heat, when finished you can put your covers on a low heat for about 20 minutes.  But if you have dry weather get those diapers outside.  Nothing is better for your diaper stains and smells than an all natural bleaching from the sunshine.  I use a drying rack and let it sit out all day long.  Makes the smells and stains completely disappear,333 041When dry, bring them inside, I usually put them in the dryer on fluff air cycle to make sure there aren’t any bugs inside of them.333 047 I stuff each diaper and set in the basket, ready for the next days wear.  333 048We love our cloth diapers and would recommend to everyone to use this brand.  ****please note I am not being paid to say this, I just want to share what works for us.

UPDATE

So I am out of the cloth diaper stage.  Would I do it all over again? Absolutely, the only difference is that I would have started out right away with my first children.  There are so many positive benefits as to why you should cloth diaper your babies….unfortunately I have never sat down and crunched the numbers….but there is a Mom who has done that:) Jenny over at Mom’s Know Best has a great article on the 10 Cloth Diapering Benefits.    

There really is a lot of neat information with images.  Check out the photo of the landfill….it may just inspire you to change:)


The other part of this post was about the woman’s alternative to maxi pads.  We would never even think that disposable diapers are good for our babies but what about for us woman???  The sanitary pads that we use are just as harmful as disposable diapers.  I have never even heard about using cloth sanitary pads, until a friend showed me years ago,  I will admit I do not do this personally but think it is worth noting for those seeking a more natural household.  You can do an internet search and find hundreds out there.  Many woman make them homemade like cloth diapers or you can buy them.  I have heard you use them just like a cloth diaper.  With a separate container to put them inside for washing.  I would recommend using peroxide as a natural stain remover as I know it removes blood easily.  Hey something new for everyone.

Next up…….switching cloth items for disposables in your household

21 days to a more natural home series part 13…dishwasher detergent

all natural home seriesWe prefer to do our dishes manually by hand but if you use your dishwasher, know that on the back of your box of detergent are some pretty strict warnings.  How many of us accidentally drop a few grains of dishwashing crystals onto the floor and then have our crawling babies get it on their hands?    It is highly toxic and the box recommends we don’t even breathe it in.  But we are going to wash our dishes where all our food and drinks touch and then enter our bodies???  Doesn’t sound right.

Here is an alternative that is safer to use. Mix the following into a bowl.

  • 1 cup borax
  • 1 cup washing soda
  • 1/2 cup citric acid–found in the canning section
  • 1/2 cup kosher salt (for scrubbing action)
  • optional– essential oils,  10 drops of orange

111

Use 1 Tbsp per load.  Even when the detergent opening is larger and will fit more into it, on the back of your “store bought detergent” it recommends using 1 Tbsp only, save your money and use the correct amount.

The citric acid will cause your mixture to “clump.”  If you leave your mixture out on the counter for a few days that will disappear.

For rinsing aid, use straight vinegar .

Are you reducing the amount of chemicals you bring into your home?  Start on day 1 of this series and see why it is so important to remove as much as possible toxic chemicals and cleaners in your home.